You have 3 options, never leave your house, pack a body bag size diaper bag with enough stuff for all your kids and suffer back aches forever since it will be so dang heavy, or one of these!
Help, I have kids and they are messy, Emergency Bag for your trunk!
Any old bag will work, even a reusable shopping bag, heck, even a plastic shopping bag really, but I wanted something cute! After all, poop in a bag is much nicer to deal with when its adorned with ruffles!
I received this very nice tote bag from my OBGYN upon getting pregnant with M5. Yep, 9 months of not sleeping and heartburn mixed with 8 hours of labor and 30 minutes of pushing and all I got was this bag .. I mean baby!
The bag is actually crazy nice, it zippers shut and has a smaller zipper pocket inside! BUT .. stamped right on the front of the name of my OBGYN, fabulous. If you are starting with a blank bag, or maybe a bag with a logo you want to cover, I am going to show you how to create this super cute ruffle!
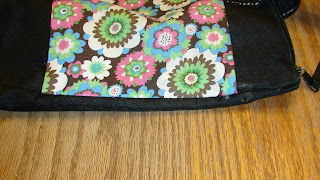
Measure the space you want to cover, for me it was the white stripe on the front with the name on it. Add 1 inch to the top and bottom for the hem, and double the length for a nice full ruffle!
Iron all your seams.
Normally I would sew this .. but since the bag is not going to get a lot of use, it basically sits in the minivan waiting for a blow out, I went with hot glue! Yep, this is a NO SEW project!
I actually glued the hems, all 4 of them.
Then you want to glue the short ends first, ends, both of them. This way your ruffle will be centered on the bag.
I just eye balled the center point of the bag and the center point of the fabric and tacked it with some glue. At this point your ruffle is glued on each side and once in the middle, now your fabric will be ruffled evenly.
Working about 2 inches at a time, spread on some glue and pinch on the fabric and glue it down. As you work along you will see it start to look ruffled.
I did the whole top first. You could stop here if you want to .. it looks cute as a ruffle! Or you can glue down the bottom of the bag, which is what I did.
Following the same steps as the top, I glued the bottom, the only difference was making sure the fabric was straight before I glued it on.
That's it! Check out how cute it is!
How about what I keep inside?
I have extra diapers and wipes, a change of clothing for my 3 youngest kids, a fold-able potty seat and a first aid kit. Oh .. ask me why the clothing are in bags?!?!
Ah .. I am glad you asked that! If the kids need their extra change of clothing, its because something went very wrong .. poop or food .. either way I am sure its going to be messy. The ziploc bag serves 2 purposes, it keeps the clothing neat and together and gives me a spot for the nasty clothing!
So there ya have it. This bag stays in the minivan, and if I have to use something out of it I make sure to replace it! And twice a year I swap out the clothes, cant carry extra shorts in January! Oh, and the best part? This whole project was FREE! I already had the bag, the fabric and the hot glue. If you had to buy fabric, 1/8th of a yard would be enough, and with a coupon that would not be more then a few bucks!
Do you carry something like this in your car? Have you had to use it?
I'm linking up to these parties:


it looks awesome!
ReplyDeleteCute cute cute! I love how organized this bag is! I'm stopping over from a blog hop If you get a chance feel free to stop by
ReplyDeletewww.iheartpears.blogspot.com
Brilliant! I can't believe you made such cute ruffles with hot glue! I am not a sewer but love cute fabric things so it's great to know I can do this! We need a bag of gear in the car like yesterday! Not so much for poop (my kids are bigger) but messes, getting wet (somehow this always seems to happen), etc. Thanks for sharing this at Gettin' Krafty!
ReplyDelete